Data Image displayed on the screen of a computer or mobile device is called a Screenshot.
I'm damn sure that you have heard the word Screenshot, although you never use it, at this time everyone knows and uses the Screenshot. Maybe you know to take a screenshot in one, two, three ways. But in this, you will know more ways to Screenshots in Windows 10.
You can take a Screenshot of the active window or the entire screen or part of your screen, or when playing a game like PUBG, want to take Screenshot of the achievements.
In this article, I'll show you different ways to take Screenshot, as per your need you can take a Screenshot.
Using The Keyboard Shortcut:
Instant Screenshot Without Saving:
The simplest way to take Screenshot instantly without saving the file hit the PrtScn or Prnt Scr or PrntScrn , whatever you have on your Keyboard. The Data Image (aka Screenshot) have been copied to your clipboard. Want to see Your Screenshot open the Image Editor like Paint, Paint 3D , Photoshop, just you've to Paste it. Your Screenshot is now on Display.
If you want to edit, you can do it with Image Editor. After editing you can save it.
Screenshot With Saving File:
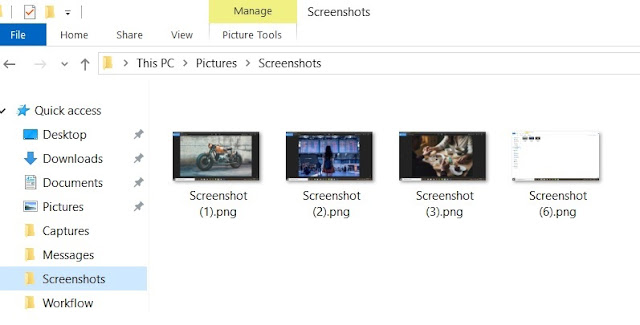
If you want, your Screenshot would be saved in file form. You can press Windows Key+PrtScn , By doing this you will capture the whole display. Windows automatically will save your Screenshot in Pictures Library under the name of the Screenshot folder. Your Screenshot will be saved as a number of sequences. In Some Laptops you've to press Windows Logo Key + Ctrl + PrtScrn or Windows + Fn + PrtScrn.
Take screenshot only active window:
Want to take Screenshot only Active Window, just open that window and then press Alt +Prnt from your keyboard. Your Screenshot will be copied to your Clipboard. Open your favorite Image Editor like Paint or something. Paste in it. You can also edit your Screenshot.
If you have a laptop, tablet with the Fn key, then try out this method:
Press Fn + PrtScr or Fn + PrntScn or Fn + PrntScrn by pressing these, the entire area of the whole screen will be copied to clipboard. It's equivalent to PrntScr.
Press Fn + Windows Logo + PrntScr , by press this your Screenshot will be automatically saved as file, it's also equivalent to Windows Logo + PrntScr .
Press Fn + Alt + PrntScr , it will take Screenshot only the Active Window, same as Alt + PrntScr.
Take Screenshot of the desired part:
Take Screenshot of your desire part, It's sounds something good. Just press Windows + Shift + S ( this feature work on in Windows 10 ).When you press this combo, your screen would be dim and a mouse cursor appears. Select the desired part of your screen with the cursor and then release it.
Your desire part of Screenshot is now ready to use. You can edit also.
Your desire part of Screenshot is now ready to use. You can edit also.
Screenshot with Game Bar:
Windows 10 introduces Game Bar while playing a game you can take Screenshot of the active game window with the help of Windows + Alt + PrntScr . Your Screenshot automatically will be saved in your disk. You can also take Screenshot in Windows 10 by pressing Windows Key + G. A pop will appear on your display, click Top Left under the Game Capturing, your Screenshot saved, that's it.
Snipping Tool:
Snipping Tool is the most devoted software to Windows. Since the time of Windows Vista, it's sticking here. But now Windows want to replace it with Snip & Sketch app. For Screenshot, the Snipping Tool did a great job. You can take a screenshot in Free-Form Snip mode, Rectangular snip mode, Window Snip Mode or Full-Screen Snip Mode.
In windows 10, it has a 'Delay' feature. you can set seconds to capture the screenshot. after setting the second, You can use any Snip Mode by your need. It's great.
Snip & Sketch:
In the October 2018 windows rolled down to an update which brings Snip & Sketches app to the world. Windows motive to bring this app to replace that old Snipping Tool. But don't worry folks, both i.e, Snipping Tool and Snip & Sketch are still there.
Snip & Sketch delivers some modifies Screenshot. It has more tools to capture the screenshot.
Open the snip & sketch, go to new or you can press Ctrl + N, it offers three modes to take a screenshot, first one is Free-Form, the second one is Rectangular and the last one is Full Screen.
In Windows Tablets:
If you want to take Screenshot on your windows Tablets, in most of the tablets, you've to take the help of the hardware part, Tap on the Windows Logo and Volume Down Button at the same time. you see the screen something getting darker that means your screenshot has been taken and it has been save to your picture library.
So here are some useful methods to take a screenshot in windows. According to your need, use it and edit it.
Also Read: Best Photoshop Alternative
So here are some useful methods to take a screenshot in windows. According to your need, use it and edit it.
Also Read: Best Photoshop Alternative


